« Posts under Dynamics/Fluids

[R&D] Feeling Winded…

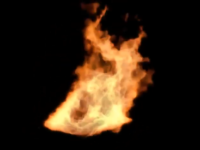
After finishing the fire effect for my project it’s time to move onto the wind portion. To create a tornado the first thing I did was jump into Maya and start setting up emitters in a fluid container. Good lord was that a bad idea. The particle motion to create a tornado consists of a lot more than fire and it’s very hard to control a fluid container with multiple emitters when you don’t know exactly what look you’re going for. After a mornings worth of work I wasn’t where I wanted to be because I still couldn’t identify how my emitters were moving the fluid around. To see anything in real time on my Mac Mini the container settings have to be low. So low that it’s not indicative of the final motion. Not even close. I started to search on the internet and found a good thread on CG Society (http://forums NULL.cgsociety NULL.org/showthread NULL.php?t=1040698) where an artist responsible for clouds and tornadoes in Resistance 3 had made a few posts. I was pointed towards using a regular particle setup to nail the look and then control the fluid container with those particles. Brilliant!

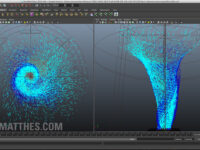
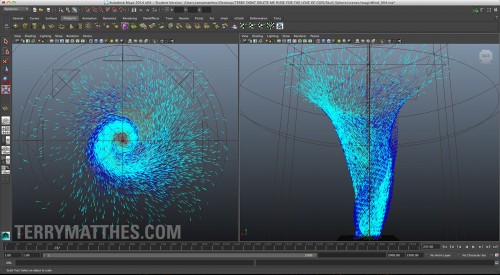
In the afternoon I created my particle tornado. It consists of 5 emitters. One large torus emitter to create the center of the tornado and 4 smaller cylindrical volume emitters placed around the base to simulate the upward streams of air you get that contribute to the storm. Beyond the 5 emitters there are a total of 4 force fields that create the motion. The first force field is a uniform field that pushes the particles straight up. This is similar if not the same as a gravity field with a +Y force. The second field is a cylindrical vortex volume. This volume spins the particles while keeping them in a cohesive shaft. The third field is a cylindrical axis volume field. This is what makes the tornado spread outward from top to bottom. I’ve set it’s “around axis” attribute to X0 Y1 Z0. This tells the particles to spin around the Y axis. The attenuation value on this field is set higher so that the particles don’t instantly push out to the edge of the volume.

Attenuation acts like an ease in and out of the volume. If you set the attenuation value to zero on any field the particles will take on the motion of the volume as soon as they enter it’s space and this can create abrupt changes in direction. The final volume is a spherical volume axis field that has been squashed and placed atop the cone to push the particles outward. I’m using the “away from axis” set to X0 Y1 Z0 to achieve this.

For the first hour or so I really struggled to get the particles to follow a nice swirling motion and then I discovered my mistake. I have to set the particle’s (not the emitter’s) “conserve” value to 0. This stopped the particles from inheriting any initial motion and gave the force fields full control. If you don’t do this it’s an uphill battle to control their initial momentum. Now that I have my particle system down the next step is to create a fluid container that these emitters will be parented to. I’ve been told that since Maya 2011 particles and nParticles have been able to emit voxel data into a fluid container. Well see how well that goes…

terryTornado (http://www NULL.terrymatthes NULL.com/wp-content/uploads/2013/12/terryTornado NULL.jpg)

UPDATE

I got my particles emitting voxel data to the fluid container in Maya. I forgot to turn buoyancy off of the fluid container so the particles keep going up past the top of the funnel, but I’ll fix that on my next go. The fluid container is using the density information to shade the particles.

[R&D] Fire Starter

Maya Liquid Fire

I’ve started a new project involving Maya and Zbrush and a big part of it is going to use simulation data from Maya. There are three parts, smoke, water, and fire. I haven’t created a fluid effects fire in a while so I thought I would spend the morning working out some flames to get back into the swing of things. This fire was made from a 3D fluid container using a volume based emitter in Maya 2013. After I had parameters I was happy with I baked out the simulation into a cache file. This makes the rendering way faster as you’re not trying to simulate and render each frame at the same time. It also lets you store that data and scrub through your simulation.

I’m working of a Mac Mini right now which is a little weak in the processing department, but hey at least I have something to work with. Come Christmas I will be visiting Winnipeg so that I can get my computer along with the rest of my apartment and move it here to Montreal.

The end result for the project will be a lot more stylized, especially when it comes to colour. I find its always best to match the physical phenomenon as best you can before you start to push the style. The YouTube compression beats up the softness and sharp contrast of the flames, but it’s just a test so I didn’t want to have to sit and wait for a 180 frames and 1080p. This will do as a start for the next step of the project which will be shaping and re shading the fire. As always if you have any questions don’t be afraid to ask. I don’t bite, I promise :)


UPDATE

I squeezed in some more time this evening to iterate further on the flames, playing with the colour settings and getting them to spin the way I wanted using Maya’s force fields in the fluid container. This particular test makes the flames too skinny and high, but I feel I’ve nailed the mechanic down to make them spin.

[R&D] Maya Software Clouds

Software Clouds Test


The above video is a slide show of viewport renders from a few evenings ago. I am working on a project that needs clouds and I thought I would give fluid container clouds a spin. Playing with clouds is lots of fun! The render times are quick and there are a fair amount of preset styles to technically guide your artistic desire. If you’ve ever played with Maya fluids you’ll be familiar with a lot of the attributes because clouds are essentially pre-emitted voxel data paired with a distinct look gained through the fluid container’s attributes. The opacity ramp can be changed just like any Maya fluid to help thin out or thicken up the clouds. The clouds get their texture through noise. usually “Perlin” or “Billowy“. The clouds I was playing with all came with a larger fluid container that encompassed the “cloud” container. This container is set to create a haze gradient that starts out transparent at the top and gets thicker as it descends in the Y axis  You can dramatically change the look of the clouds by colouring the “haze” container. This container is essentially the infinite sky the clouds are painted on. This sky isn’t technically infinite though as it’s confined by the dimensions of the container.

The container is actually quite small when  you import the cloud presets. I had to scale mine up 20-30 times their initial size before they were large enough to encompass the render view. Before you go and scale up your clouds you should know that there are several ways to “scale” clouds. You could…

  • [A] increase/decrease the physical space the clouds occupy
  • [B] increase/decrease the physical size of the cloud within that space
  • [C] increase/decrease the entire simulation size essentially scaling all elements equally

To Achieve [A] you  would increase the size X Y Z values under  the “Container Properties” roll out in the “cloudLayerShape” node.

Scaling the clouds within the space [B] is done by changing the “Frequency” slider under the “cloudLayerShape” node’s “Textures” roll out.

The simplest form of scaling [C] will just give increase the general size of the simulation making everything “bigger”. You can just select the fluid containers in your viewport and scale them to get this done.

That’s all for now :)

Software Clouds Test (http://www NULL.terrymatthes NULL.com/wp-content/uploads/2013/03/cloudsF NULL.jpg)