« Posts tagged chain

[Game] Combat Cross WIP 1

Combat Cross WIP 1

I’m a sucker for gothic and macabre games. When the Castlevania: Lords of Shadow 2 came out last month I new I had to play it. Lords of Shadow 2 is a lot of fun in it’s own right, but I really missed the awesome whip animations in the original reboot. Now Dracula uses his own blood as a type of magic whip and the splashy nature of this doesn’t feel as solid as the chain whip in the last game. Work is starting to get busy as we near the end of a project and there has been a company wide call for art submissions. There’s a raffle with prizes to be won based on all the entries they receive. We have just over a week until we have to submit our art and that’s a little less of a heads up than I would like. To make up for the short time I’ve decided to do a prop instead of a scene.

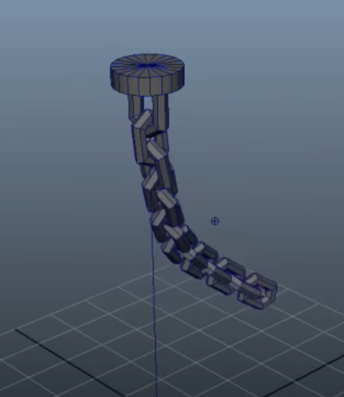
My final submission will be a rendered shot of the Combat Cross laying on a cracked marble floor aged and covered in cob webs. The first step was to model the basic shapes of the cross. For most of this I started with primitives in ZBrush. If a shape was made of multiple primitives I would merge them, create a dynamesh with the new merged tool and then ctrl drag to connect their topology as a single dynamesh. I haven’t decided if I want to do a low poly cage over the entire mesh, or just export the decimated parts into Maya and then group them all. The leather rapped handle was created in Maya by making low res polygon rings and placing them up and down the shaft of the cross. The next step for them will be to smooth them out in ZBrush and using the move tool to make them overlap without penetrating strangely.Combat Cross WIP 1 
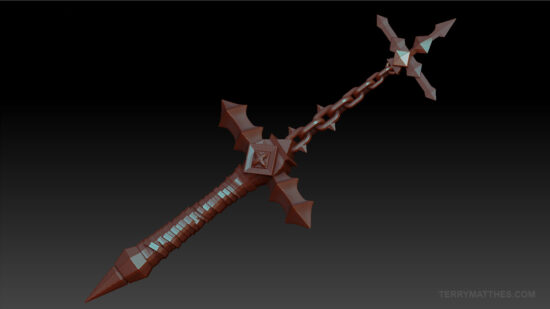
(http://www NULL.terrymatthes NULL.com/wp-content/uploads/2014/04/combatCrossWIP1_001 NULL.jpg)
I’m not 100% sure, but I think I’ll be chosing to render this with VRay instead of Mental Ray. I know I’m going to want a layered material for the dust over all the surfaces and Mental Ray drops the ball entirely on this. There is a layered shader, but it doesn’t make it all the way through the rendering pipeline unscathed. VRay also seems to be a lot faster in general. I’ll be posting more about the cross this week as the submission is due this Friday (April 11th 2014).

[R&D] nHair Chain Strand Rig Part 2 of 2

This post is a continuation of my last post here (http://www NULL.terrymatthes NULL.com/maya/animation/maya-nhair-chain-strand-rig/). In the first post I explained that I was trying to create a strand of chain that was dynamic, but pinned at both ends like a strand of Christmas garland. At the time I wasn’t able to find any information on how to pin the loose end of the chain to an anchor pertaining to nHair. All tutorials I read/viewed were to do with the legacy hair system whose constraints don’t work on nHair curves. Well I’m here to report that I’ve found the solution I needed.

When working with nHair you need to make sure any objects you want it to interact with can also be seen by the nucleus solver. For my purposes this meant turning the polygon object representing my anchor at the end of my chain into a nMesh passive object. Once my polygon anchor was converted it could be used for a “component to component” nConstraint. I constrained the last CV in my dynamic hair curve to a vertex on my polygon anchor. Everything works great now and I can move either end of the rig around and it affects the chain as it should.

Time for bed *yawn*… well maybe a couple episodes of Full Metal Alchemist first. Damn you Netflix!


[R&D] nHair Chain Strand Rig Part 1 of 2

Rigging… It’s not my favorite aspect of 3D, but that’s probably because It’s also my least practiced. What better way to learn though than to jump right into nHair and IK Splines, right :D ? My end goal with this rig is to have several strands of chain that are strewn across a mirror ball attached at several points, think of garland on a Christmas tree if you need a visual. As always to start I researched how this could be accomplished in Maya. Every tutorial I read/watched mentioned IK splines and Maya’s hair system.

It took me the entire morning, but I was eventually able to produce a chain strand constrained on a single end. The biggest problem I ran into was constraining the far end of the chain to an object. Literally all the tutorials out there are using the old Maya hair System. With the copy of Maya I currently have (2014) you are forced into using Maya’s “nHair” system and the “n” stands for “Nucleus”. Nucleus if you’ve never heard of it is Maya’s new dynamic simulation system that unifies all your dynamic elements so they can operate in conjunction with each other. It’s Very similar to how Side Effect Software’s program Houdini works. So great, “yay”, everything works together, but all the constraints mentioned in the tutorials I watched are based on the old hair system and they do not work with nucleus hair. So this is as far as I have gotten today, and It will probably take another half day to find the proper type of constraint that acts in the same way a “stick” constraint does with legacy hair.

There are plenty of scripts out there that will do this task for you, but I try to avoid scripts when learning. I that find that; (A) it’s essentially letting someone else do the work for you which means you didn’t actually learn anything and (B) depending on how the script works, it could have unintended consequences immediately or down the road. For those of you who have never created anything like this before and are looking for answers here are the steps I used to create the rig and as always don’t be afraid to ask questions :)

  1. Model a chain link and then duplicate it over and over to create whatever length of strand you need.
  2. Use the joint tool to create a joint chain all the way down your strand putting a joint between each place where the pieces of chain meet up.
  3. One by one starting with the top chain link and the top joint use the rigid bind tool to bind each link to its corresponding joint. In the rigid bind options make sure you have the “Bind to: Selected joints” option activated.
  4. Draw an EP curve down the length of the chain adding a point over each of the joints you previously created. Press to “P” key to activate pivot snapping and your points will automatically center on the joints. Rename this curve something like “epc_original”.
  5. Make your curve a dynamic nHair curve through the nDynamics > nHair menu. You need to first make sure that the only option in the “Make Selected Curves Dynamic” option box that is selected is “Attach curves to selected surface”. This will now create a hair system and follicle system in your outliner.
  6. The last step is creating the IK spline and this is where most people make a mistake because they select the wrong curve. In the Animation > Skeleton menu select the option box for the “IK Spline Handle Tool”. Make sure the only option selected is “Root on curve”. With the tool active click in this order… the first joint of your joint chain then the last joint on your joint chain and now open your outliner and hold down ctrl(PC) or cmnd(Mac) and select the curve under the “hairSystem1OutputCurves” node. An IK node should now appear in your outliner.
  7. Lastly select the original curve and parent it to whatever piece of geometry you’d like to constrain the top of the chain to. Now if you use the interactive playback feature and drag that geometry around your chain will follow.

As soon as I figure out how to constrain the other end of the chain with nHair I’ll post an update, and if anyone figures it out before I do then please let me know. Bye for now :)


UPDATE!

Part 2 : The rig gets completed with moveable anchors at both ends. (http://www NULL.terrymatthes NULL.com/maya/animation/nhair-chain-strand-rig-part-2-of-2/)