« Posts tagged sculpt

[Game] Snowy Turn Table Final

Freshly fallen snow on a grave

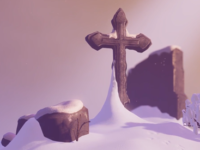
Another day and another piece done :) I had a great time putting together this snowy turn table and trying out all sorts of different methods in ZBrush for creating snowy surfaces. For some extra fun I even threw in some “Matinee” animations using Unreal’s animation system.

The snow covered assets in the scene use what is basically a layered material to map the snow, ice, and base materials over their surface. This is done through using the “Lerp” node in the material editor. If you’ve ever tried to create a layered material in Mental Ray you will appreciate what the lerp node does. Using an 8 bit (gray scale) map the Lerp node transitions values. Think of it like a mask. You can use a bunch of these Lerp nodes in a single material to create a layered shader. There are other ways of getting more than one material on an asset in the UDK though.

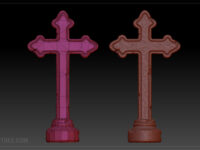
When exporting your assets as “FBX” files in Maya you can assign up to six (as of Unreal Engine 3.0) different materials per mesh. This is done through simply creating up to six different Lambert materials and applying them on a per face basis. This is a very convenient way to assign materials to your meshes, but it does have it’s downsides. Firstly, you are adding extra draw calls for each new material you assign your asset. This differs from using the Lerp node because with Lerp method all your different surface types are constructed within a single Unreal material and consequentially, a single draw call. Secondly, the borders of your materials must lye along the edges of their assigned faces. This can end up giving you abrupt transitions that won’t look as smooth as painting a mask for a Lerp node. Going forward I would like to expand on what I’ve done in Matinee and produce an animated character with some dynamically driven accessories.

Oh yeah, I almost forgot to mention that I’m moving to Montreal Canada. I’ll be heading out November 5th and my first stop will be their Independent Game Developers Association. I’m super excited to meet fellow developers and check out all the wonderful studios in Montreal.


[Game] Snowy Turn Table WIP 2

Freshly fallen snow on a grave

Here is an update on my snowy turn table I’ve been putting togeather. I’ve added some animated lighting and given most of the meshes another iteration of detailing and fixes. The next thing I have to do is finish the snowy bushes and make the ice on all the meshes more obvious. As a final touch I might at a sun and a moon togeather with the proper positioning of those respective lights. So have a look :)

[Game] Tombstone WIP – Sculpting

High and Low Poly Tombstone

High and Low Poly Tombstone (http://www NULL.terrymatthes NULL.com/wp-content/uploads/2012/11/tombstone_wip NULL.jpg)Over the past few years I have really started to feel dependent on Maya as my 3D application of choice. It’s an amazing piece of software, but when it comes to creating game assets ZBrush eventually came impossible to ignore. This is my first attempt and producing a game asset from start to finish in ZBrush. To help me get started I sat down with a friend of mine who is a character artist by trade and spends a lot of his time in Zbrush. After learning about some really important concepts such as Poly Groups and using Zspheres for retopology I was on my way. The low poly on the left clocks in at ~1K polys which is what my target was. The original on the right was about 4 mil, but that doesn’t really matter because we are only using it for baking our texture maps. The next step for me is to UV map the low poly version and then it’s off to xNormal (http://www NULL.xnormal NULL.net/1 NULL.aspx) for transferring the details from the high to the low.

The stub mesh I started with was created in Zbrush using Shadowbox and the black and white texture below. I looked at my concept art and created a Z axis portrait and a X axis portrait of the tombstone for the Shadowbox alpha. I really like this work flow as it’s incredibly fast and can save you a lot of time when it comes to creating your base to sculpt on. The cuts in the rock surface were made with the clip curve brush and then I used the Trim Dynamic brush to flatten out the sharp edges. The rocky noise was made using Surface Noise and then repeating the process after masking off certain portions of the mesh usingĀ  the Mask by Cavity function.Alpha Texture for Grave (http://www NULL.terrymatthes NULL.com/wp-content/uploads/2012/11/grave_D NULL.jpg) One thing I found useful was the ability to save out noise profiles for later use. I have about six tombstone to make so not having to toy with the noise curves for each one will save me a lot of time. The last step was to go in by hand and carve in individual cracks with the Dam Standard brush. This mesh is going to be used in a scene I’m creating for the UDK. I’m really excited to attack this mesh with poly paint after it has UVs as I recently watched a great video (http://www NULL.cgnuggets NULL.com/collections/frontpage/products/september-2011-video-polypainting) on the subject by Jesse Sandifer. More to come soon :)

Explorer Zbrush Progress

Explorer Face

Explorer Face (http://www NULL.terrymatthes NULL.com/wp-content/uploads/2011/12/face NULL.jpg)My last post was of the concept I had painted up for my random attribute character. For those of you who missed it, I was given the task of creating an elderly prehistoric female explorer with a corrupt disposition. I was originally going to make her a fat character, but as I started to flesh things out it just didn’t make sense. If she’s walking around all the time she is probably pretty thin. The anatomy reference I’m using for the sculpt is of a much younger woman, there’s not a huge amount of naked t-posed grandmas on Google images… thank god.

Explorer Feet (http://www NULL.terrymatthes NULL.com/wp-content/uploads/2011/12/feet NULL.jpg)This sculpt was actually started in Maya. I built a base mesh to nail the basic shapes and then just exported as an OBJ file for ZBrush.At this stage in the sculpt I’m trying to work in the basic muscle forms. A lot of her body is going to be covered up by furs and leather so I’m not going to push the detail too far. I just want enough so that when I create her clothes they will rest properly over her body. I’ve barley touched the third sub division here and I’ve only been using the “move” brush. I find that at these lower subdivisions there isn’t really a need to “sculpt” detail in. At this stage is still a process of picking and pulling vertices around. This project is due on the 9th (next Friday), so I’ll be moving along on it quite quickly now. More posts to come on Sunday :)
Explorer Hand (http://www NULL.terrymatthes NULL.com/wp-content/uploads/2011/12/hands NULL.jpg)Explorer Torso (http://www NULL.terrymatthes NULL.com/wp-content/uploads/2011/12/upperFront NULL.jpg)Explorer Back View (http://www NULL.terrymatthes NULL.com/wp-content/uploads/2011/12/back NULL.jpg)

Crow Sculpt Final

Hey everyone, just posting some final shots of my crow sculpt after several long evenings. The major change you’ll notice from the previous update is the feather treatment. On the old sculpt I used the snake hook tool to pull geometry out for the feathers. In the end I wasn’t happy with how this technique looked. For the final I created a few custom feather alphas. I would stamp a row of the feathers and then mask them off and pull out the next row, continuing this process until the entire chest was covered. For an initial foray into Zbrush I am happy with the results here, but I think that I need to learn more about the layers options and morph targets. The undo system seems somewhat tricky to work with and there were several occasions when it didn’t work at all. I also learned that my system can’t handle merging 3 different 13 million poly meshes. I’d chuck more RAM in, but I’m already at my boards 8GB max. I hope you all have a nice remembrance day.

Final crow - perspective (http://www NULL.terrymatthes NULL.com/wp-content/uploads/2011/11/CrowFinal_persp2 NULL.jpg)Final crow- close up (http://www NULL.terrymatthes NULL.com/wp-content/uploads/2011/11/CrowFinal_close NULL.jpg)Final crow - centered (http://www NULL.terrymatthes NULL.com/wp-content/uploads/2011/11/CrowFinal_center NULL.jpg)Final crow - side view (http://www NULL.terrymatthes NULL.com/wp-content/uploads/2011/11/CrowFinal_persp NULL.jpg)

Zbrush – Crow Man

Perspective view of sculpt

Say hello to “Crow Man”, my first Zbrush sculpt. On Monday we started learning Zbrush in class and it’s been a lot of fun. When I start learning a new program I usually have this insane drive to do everything the “proper” way. Zbrush has so many tools and features it’s actually a little scary. Instead of learning every little detail of the work flow I’ve decided just do use the basic features and work my way through this sculpt. I’m finding this is letting me get more work done and is interrupting my creative flow a lot less. Sure I might not be doing everything the most efficient way, but I think it’s a better way to get your feet wet.

I’d like to say that this piece has a lot of inspiration from one place or another, but to keep with my “loose” method I’ve just been sculpting in whatever pops into my brain. That’s not to say that I’m without reference though. After deciding to do a crow I compiled several images of crows and black birds. I’ve also got a few of my human anatomy references up for the skull and torso. I’ve really tried to push the geometry of the skull to extremes so that the character really has a distinct face. Birds are also related to reptiles so I’ve tried to work in a few lizard like features of offer some artistic variety. You can see this in the bony mounds around the eyes.

The reference has proved most useful to me for the fine details. It’s easy to imagine the large forms and features in your head, but as you increase the detail it becomes a lot harder to just imagine a lot of those finer elements. I’ve got a lot of snes and early console RPG references floating around in my head and those games never had this finer detail because it wasn’t technically possible. The hardest part of this sculpt for me is knowing what each brush does. There are so many and each can be manipulated to a near infinite degree.

For the majority of the sculpt I have been using 4 brushes: standard, pinch, inflate and move. At lower detail levels the move brush has been great for pulling gross forms around and altering the profile of the character. The standard brush has been used for building up the surface in places, and the pinch and inflate are awesome for popping detail out of the surface. All in all this has been pretty fun and I still have yet to paint and texture it. We will be learning how to do that this week in class. I’ll post the painted version when it’s done. If things go well I’ll take it into Maya and use mental ray to pop out a nice render :)

Perspective view of sculpt (http://www NULL.terrymatthes NULL.com/wp-content/uploads/2011/11/perspective NULL.jpg)Detail view of sculpt (http://www NULL.terrymatthes NULL.com/wp-content/uploads/2011/11/detail NULL.jpg)Side view of sculpt (http://www NULL.terrymatthes NULL.com/wp-content/uploads/2011/11/side NULL.jpg)Center view of sculpt (http://www NULL.terrymatthes NULL.com/wp-content/uploads/2011/11/center NULL.jpg)