Finished this project as an Assistant Technical Director for Framestore (https://www NULL.framestore NULL.com/) in 2019.
Finished this project as an Assistant Technical Director for Framestore (https://www NULL.framestore NULL.com/) in 2019.

Finished this project Render Wrangling for Framestore (https://www NULL.framestore NULL.com/) in 2019.
 (http://www NULL.terrymatthes NULL.com/wp-content/uploads/2018/08/CGChallengeOne NULL.jpg)
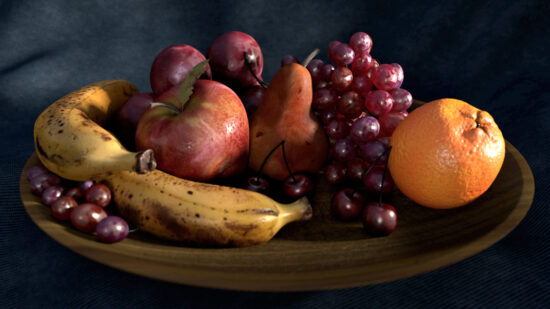
The models for everything in the scene were taken from 3DRender.com as part of their Lighting Challenge #1. I wanted to visit this challenge once more as a test of the free Renderman render plugin for Maya. The challenge is that you are given the 3D models to work with and your job is to texture, light and render the scene. Choice of lens and camera position are left up to the individual. I thought the plugin was fairly easy to work with and had a decent realtime render mode via CPU.
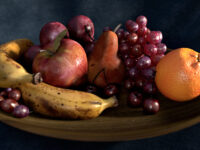
The photographs were taken in a lightbox using a camera mounted above it facing downwards.
I constructed the light box from white posterboard. The box itself was facing with the open side upwards. Then the camera straddled the box and the camera was underneath the tripod to shoot straight down. These are some samples of the raw shots
I later brought shots like these into Photoshop to remove an strong lighting info. I had one small setback when I was editing the photos. They had more grain than I anticipated, and it made it a little more difficult to fix some of the lighting info. Overall I was really happy with the results.
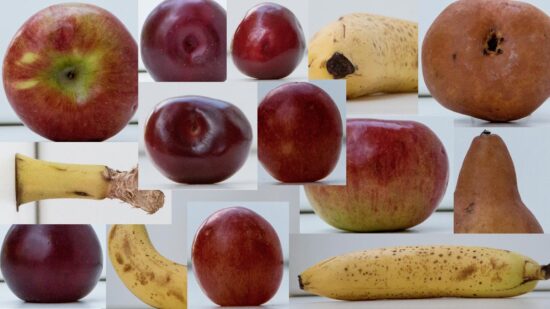 (http://www NULL.terrymatthes NULL.com/wp-content/uploads/2018/09/fruitcollage NULL.jpg)
The majority of the shapes are spherical in nature, so the UVs followed and were produced with spherical projections. I did want to try something different on the banana though. I cut the bananas along their natural edges and then squished them out of the peel. After the peel was flattened I snapped a shot. Later on in Maya I formed the UVs around the image. The bananas turned out great and I feel this was a big part of why.
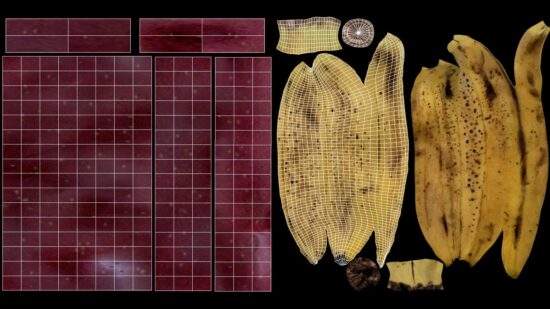 (http://www NULL.terrymatthes NULL.com/wp-content/uploads/2018/09/fruituvs NULL.jpg)
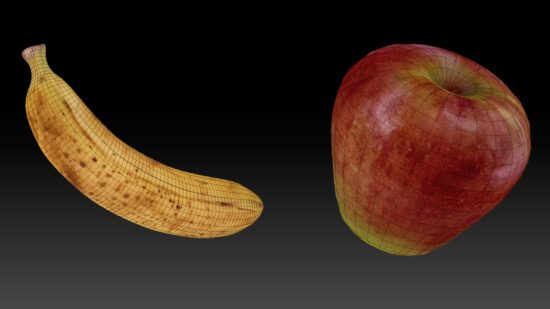
ZBrush is always fun to work in. I think that’s one of the programs big wins. Before Substance Painter came along it was a great way (and still is) to get your assets textured. Being able to resample areas of textures to stamp using Spotlight feels awesome. It lets you mix and match details from several different photos with ease. Painting your objects in 3D is such a liberating feeling when compared to painting in 2D.
 (http://www NULL.terrymatthes NULL.com/wp-content/uploads/2018/09/fruitZbrush NULL.jpg)
There are two spotlights in the scene the key light is on the far right. It’s pushing through a large light blocker with a windows shape punched out. The fill light coming from the left of the photos is doing it’s job of pulling the shadows up so they appear softer. The surfacing of the fruit was easier to do in Renderman than previous render plugins. I found that the ability to control the second specular lobe made a huge difference. Although it isn’t necessarily physically correct that doesn’t matter in this instance. The interactive rendering you can do with even just your CPU for Renderman is pretty good. The one thing that really superised me with Renderman was the render settings you have to play with. Compared to Vray, or really any other render plugin out there it’s fantastic. There are a few confusing things like the colour you get when using Sub Surface Shading, but it is explained in the online documentation.
 (http://www NULL.terrymatthes NULL.com/wp-content/uploads/2018/09/lightingFruit NULL.jpg)
Overall I would recommend RenderMan to anyone who wants to free their artistic mind and get away from being bogged down with technical details.

Finished this project as a Render Wrangler for Framestore (https://www NULL.framestore NULL.com/) in 2019

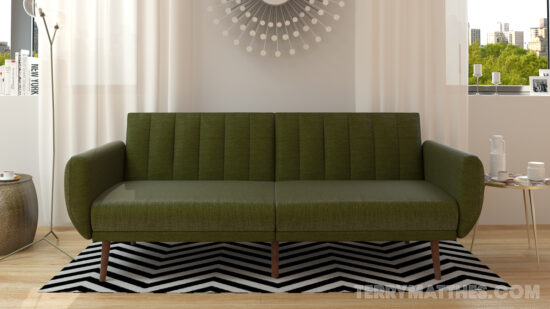
The couch was the focus in this scene for me. It was part of a small contract for Wayfair. Their 3D Generalist broke his arm while on vacation and they needed a CG model made of their Novagratz Brittany Sofa. I was given photos of the couch and asked to model and surface it for their web catalogue. I used Maya to create a stub mesh with proper dimensions then took everything into Zbrush to be sculpted. The rest of the meshes were purchased off of Turbo Squid. I then created the materials for all objects in the scene. The last steps were to light, render and finally composite the scene in Nuke. I rendered the scene using Vray. Almost all of my previous modeling was done by creating a scale stub in Maya and then working it out in ZBrush. 3DSMax is a different beast altogether when it comes to modeling. Thankfully VRay seems to work in a similar fashion from within 3DSMax as it does in Maya. I still don’t quite understand the new ‘Slate Material Editor’. It seems that materials I create from within the Slate editor don’t show up in the Compact editor and vice versa. Most of my shaders don’t require crazy node networks so I’m happy using the simplified editor.
 (http://www NULL.terrymatthes NULL.com/wp-content/uploads/2018/01/LoftInterior_Web2 NULL.jpg)
A lot of the time developing this scene was spent on the couch’s material. I wanted to make sure the linen came through really strong and crisp. Rendering the couch without losing the detail in the bump was my main concern. I ran with a 4K diffuse map and a 4K bump map to create most of the detail in the material. A spec map was also used to control how the highlight spread over the couch’s surface. The raw render is 4000×2666. Below is detailed snipped of the full resolution render.
 (http://www NULL.terrymatthes NULL.com/wp-content/uploads/2017/07/detail NULL.jpg)
Most of the folds and creases in the couch were created in ZBrush. I didn’t want to add too much wear and tear to the couch as it was designed for use in a product shot. Usually I would render out a default material pass to show the shapes in the scene, but this Global Illumination pass does a fine job.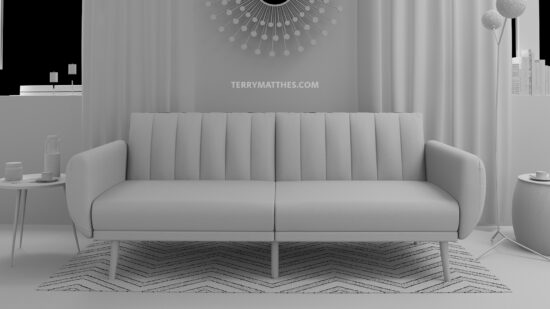 (http://www NULL.terrymatthes NULL.com/wp-content/uploads/2017/07/couch1920GI NULL.jpg)
I haven’t had a chance to use the UVW pass on this shot, but I would like to play around with it in the future. The idea of being able to assign a new texture to the couch in post sounds really cool. I think it could have some really useful implications for product rendering. I’ve been thinking more and more about exteriors lately and I think I might try to model an outside scene in the near future. For now I’ll leave you with render passes created in 3DSMax for Nuke below.
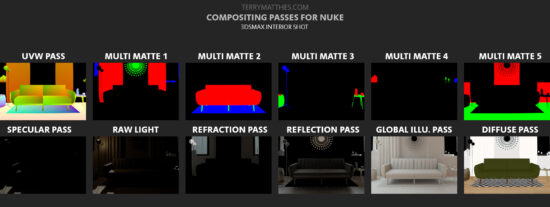 (http://www NULL.terrymatthes NULL.com/wp-content/uploads/2017/07/NukeCouchPasses NULL.jpg)
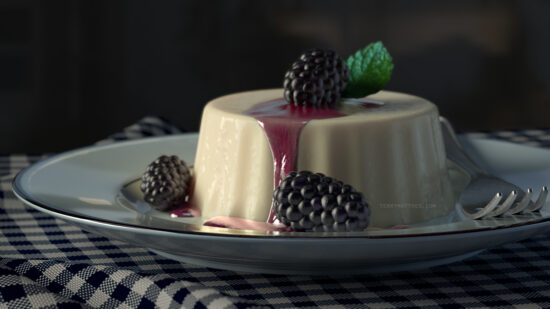
Food is something I’ve wanted to render for a while. It seemed like a good rendering challenge given how familiar people are with the look of food. When I think of what really sells an object in a scene as “real” it’s the surface detail. I could have used displacement textures to refine the surface detail, but in this case I modeled the surface detail. I find modeling almost always gives a faster rendering result. Displacement takes a long time to calculate and on top of that you’re going to need a large resolution displacement material to get good results again adding to the render times.
 (http://www NULL.terrymatthes NULL.com/wp-content/uploads/2016/12/Panacotta1280 NULL.jpg)
Even with a model that’s a quarter of a million polygons its still faster to render the result. The base shape of the panacotta was made in Maya to scale in cm then brought into ZBrush. In ZBrush I added some generic noise as a base using ‘surface noise’. I then went in with the ‘Dam standard’ brush and added some extra pitting to the surface. Finally I went over some of the edges with the ‘Trim dynamic’ brush to give the appearance of scraping or tearing where the dessert would have contacted the mold as it was popped out.
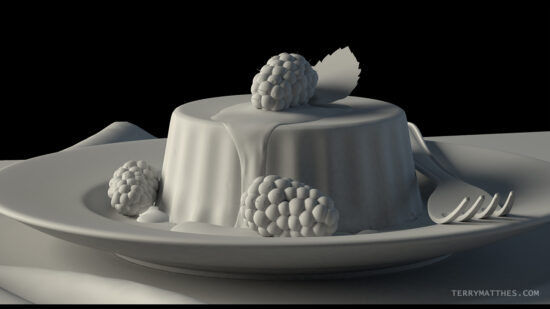 (http://www NULL.terrymatthes NULL.com/wp-content/uploads/2016/12/Panacotta_Grey NULL.jpg)
To create the blackberries I started in Maya. I made a bunch of polygon spheres and placed them in the basic shape with an interior shape that filled the gaps in between the spheres. This was then brought into Zbrush as an OBJ. Quickly after turning the mesh into a Dynamesh I used the ‘Nanomesh’ feature to drag hairs out of the berries faces.
Originally I had planned to create a fluid simulation for the sauce, but time did not permit. I instead drew a mask over the surface of the panacotta in ZBrush. I then used the ‘Extract‘ option to create a copy of the masked area. This was then sculpted into the sauce that lays over the dessert. The sauces on the plate were simple polygons modeled in Maya.
 (http://www NULL.terrymatthes NULL.com/wp-content/uploads/2016/12/panacottaComp NULL.jpg)
An unexpected challenge to this piece was the colour correction. From one device to the next the colour would vary quite a bit. With furniture and objects this isn’t as much of a problem as with food. The colour being too saturated can leave the food looking unappealing, too bright and it looks fake. In the end I tried to achieve a good balance between the two given the devices the final image was to be viewed on.
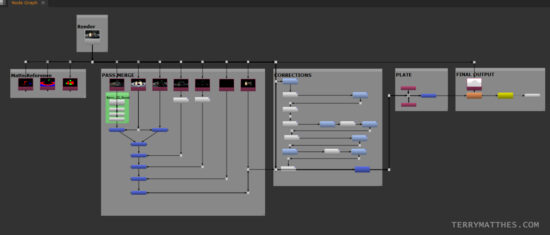
Below is a shot of my VRay passes from Maya. Nothing too crazy going on here. I should mention that this is the first time I’ve used ‘Raw’ passes in VRay. Specifically ‘Raw Global Illumination’ and ‘Raw Lighting’. I’m happy with the result. The compositing of those nodes varies slightly from traditional passes. They are merged with the ‘Diffuse pass’ using a ‘Merge’ node set to ‘Multiply’ rather than simply merging all the passes atop each other with Merge nodes set to ‘Plus’.
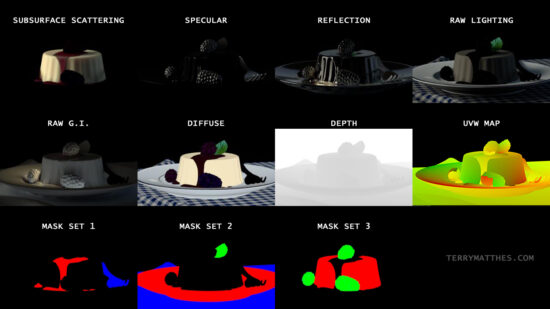 (http://www NULL.terrymatthes NULL.com/wp-content/uploads/2016/12/PanacottaPasses NULL.jpg)
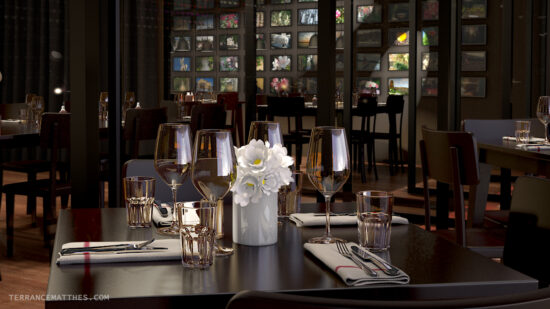 (http://www NULL.terrymatthes NULL.com/wp-content/uploads/2016/09/BrasserieB NULL.jpg)
 (http://www NULL.terrymatthes NULL.com/wp-content/uploads/2016/09/BrasserieA NULL.jpg)
 (http://www NULL.terrymatthes NULL.com/wp-content/uploads/2016/09/Brasserie3 NULL.jpg)
 (http://www NULL.terrymatthes NULL.com/wp-content/uploads/2016/09/Brasserie1 NULL.jpg)