« Posts under Technical Art

[Unreal TA] Universal Studio Villian-Con

(http://www NULL.terrymatthes NULL.com/wp-content/uploads/2023/10/VillainCon NULL.jpg)

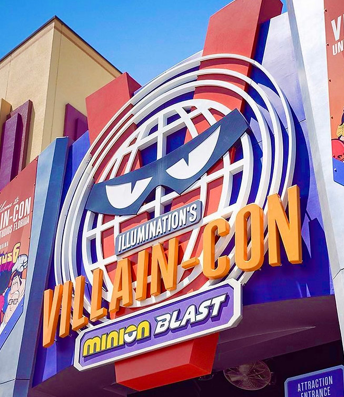
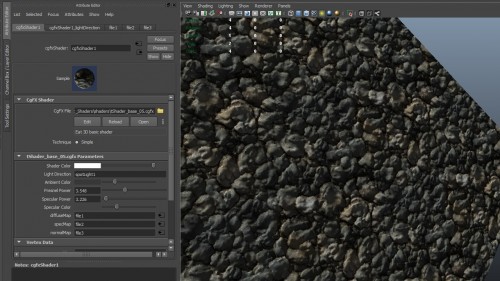
What started over a year ago as offsite development has turned into onsite integration at Universal Studios Orlando. While onsite I worked out of Universal’s offices. It was a nice change of pace to be working with a client in their Studio. There’s a lot to be gained creatively from that kind of environmental shift. A lot of the work for me on this ride was iterating over the look of the lighting and assets with the creative director every couple of days. I would fine tune the look of each of the ride’s scenes with the lighter and then move onto some of the more technical art implementations. There is wall full of disco lights in one of the scenes and I’m particularly proud of the technical implementation of it. I was able to use some really fun texture tricks to give a good looking wall with a really low resource footprint. I might make a post about the technique as not a lot of people use UVs to the level they should be and that is a shame.

Through the course of working with other teams I found we were running into a lot of problems relating to texture requirements. Non square textures, non power of two textures, improperly tagged properties ect. I ended up writing a Python script to run over all textures on the project and provide a list of offending textures along with their violations. This script also set the texture’s max in game resolution. Being half in film and half in games we get a lot of resources that are way too high resolution for games so it’s a good practice of ours to always limit that in Unreal automatically.

Everyone on the project was exceedingly nice and tried their best to get along and respect each other’s schedules. It’s not easy when you have so many vendor’s working together. It can feel like someone is stepping on your toes when they’re really just trying to avoid creating an issue for someone else. The amount I learned while on this project was definitely the highlight. I got to work with some amazing people who are doing and have done amazing things. It was also pretty cool to have the creative execs from Illumination come down and give us feedback on our work. You don’t get an opportunity like that very often and I’m grateful for it.

(http://www NULL.terrymatthes NULL.com/wp-content/uploads/2023/10/20230422_202021 NULL.png)

[Unreal TA] Clash of Clans Ads


Recently our studio Squeeze (https://www NULL.squeezestudio NULL.com/) was tasked with creating some user acquisition ads for Super Cell’s Clash of Clans. I was responsible for the technical art systems in Unreal. This included wind and material systems as well as R&D for the ray traced Lumen rendering. It was a ton of fun and with any luck we’ll be at it again soon! They even let me drone on about some of the benefits of real time vs deferred rendering in the video above. There is a wind system I created that hooks into the grass, plants and trees. The FX artist was able to key the wind strength to align to his explosions giving the shots a more cohesive feel.

Later on I took the system I had developed for these ads and then improved upon it by implementing pivot painting on the grass. Pivot painting properly anchors the blade of each grass card to the ground. A lot of the time with material based wind effects you’ll get a general ‘waviness’ when wind is applied to an object, but it rarely looks correct. There was a little bit of cloth simulation being used here, but we kept it to a minimum as it can be very hard to art direct.

[R&D] nHair Chain Strand Rig Part 2 of 2

This post is a continuation of my last post here (http://www NULL.terrymatthes NULL.com/maya/animation/maya-nhair-chain-strand-rig/). In the first post I explained that I was trying to create a strand of chain that was dynamic, but pinned at both ends like a strand of Christmas garland. At the time I wasn’t able to find any information on how to pin the loose end of the chain to an anchor pertaining to nHair. All tutorials I read/viewed were to do with the legacy hair system whose constraints don’t work on nHair curves. Well I’m here to report that I’ve found the solution I needed.

When working with nHair you need to make sure any objects you want it to interact with can also be seen by the nucleus solver. For my purposes this meant turning the polygon object representing my anchor at the end of my chain into a nMesh passive object. Once my polygon anchor was converted it could be used for a “component to component” nConstraint. I constrained the last CV in my dynamic hair curve to a vertex on my polygon anchor. Everything works great now and I can move either end of the rig around and it affects the chain as it should.

Time for bed *yawn*… well maybe a couple episodes of Full Metal Alchemist first. Damn you Netflix!


[R&D] nHair Chain Strand Rig Part 1 of 2

Rigging… It’s not my favorite aspect of 3D, but that’s probably because It’s also my least practiced. What better way to learn though than to jump right into nHair and IK Splines, right :D ? My end goal with this rig is to have several strands of chain that are strewn across a mirror ball attached at several points, think of garland on a Christmas tree if you need a visual. As always to start I researched how this could be accomplished in Maya. Every tutorial I read/watched mentioned IK splines and Maya’s hair system.

It took me the entire morning, but I was eventually able to produce a chain strand constrained on a single end. The biggest problem I ran into was constraining the far end of the chain to an object. Literally all the tutorials out there are using the old Maya hair System. With the copy of Maya I currently have (2014) you are forced into using Maya’s “nHair” system and the “n” stands for “Nucleus”. Nucleus if you’ve never heard of it is Maya’s new dynamic simulation system that unifies all your dynamic elements so they can operate in conjunction with each other. It’s Very similar to how Side Effect Software’s program Houdini works. So great, “yay”, everything works together, but all the constraints mentioned in the tutorials I watched are based on the old hair system and they do not work with nucleus hair. So this is as far as I have gotten today, and It will probably take another half day to find the proper type of constraint that acts in the same way a “stick” constraint does with legacy hair.

There are plenty of scripts out there that will do this task for you, but I try to avoid scripts when learning. I that find that; (A) it’s essentially letting someone else do the work for you which means you didn’t actually learn anything and (B) depending on how the script works, it could have unintended consequences immediately or down the road. For those of you who have never created anything like this before and are looking for answers here are the steps I used to create the rig and as always don’t be afraid to ask questions :)

  1. Model a chain link and then duplicate it over and over to create whatever length of strand you need.
  2. Use the joint tool to create a joint chain all the way down your strand putting a joint between each place where the pieces of chain meet up.
  3. One by one starting with the top chain link and the top joint use the rigid bind tool to bind each link to its corresponding joint. In the rigid bind options make sure you have the “Bind to: Selected joints” option activated.
  4. Draw an EP curve down the length of the chain adding a point over each of the joints you previously created. Press to “P” key to activate pivot snapping and your points will automatically center on the joints. Rename this curve something like “epc_original”.
  5. Make your curve a dynamic nHair curve through the nDynamics > nHair menu. You need to first make sure that the only option in the “Make Selected Curves Dynamic” option box that is selected is “Attach curves to selected surface”. This will now create a hair system and follicle system in your outliner.
  6. The last step is creating the IK spline and this is where most people make a mistake because they select the wrong curve. In the Animation > Skeleton menu select the option box for the “IK Spline Handle Tool”. Make sure the only option selected is “Root on curve”. With the tool active click in this order… the first joint of your joint chain then the last joint on your joint chain and now open your outliner and hold down ctrl(PC) or cmnd(Mac) and select the curve under the “hairSystem1OutputCurves” node. An IK node should now appear in your outliner.
  7. Lastly select the original curve and parent it to whatever piece of geometry you’d like to constrain the top of the chain to. Now if you use the interactive playback feature and drag that geometry around your chain will follow.

As soon as I figure out how to constrain the other end of the chain with nHair I’ll post an update, and if anyone figures it out before I do then please let me know. Bye for now :)


UPDATE!

Part 2 : The rig gets completed with moveable anchors at both ends. (http://www NULL.terrymatthes NULL.com/maya/animation/nhair-chain-strand-rig-part-2-of-2/)

[R&D] Feeling Winded…

After finishing the fire effect for my project it’s time to move onto the wind portion. To create a tornado the first thing I did was jump into Maya and start setting up emitters in a fluid container. Good lord was that a bad idea. The particle motion to create a tornado consists of a lot more than fire and it’s very hard to control a fluid container with multiple emitters when you don’t know exactly what look you’re going for. After a mornings worth of work I wasn’t where I wanted to be because I still couldn’t identify how my emitters were moving the fluid around. To see anything in real time on my Mac Mini the container settings have to be low. So low that it’s not indicative of the final motion. Not even close. I started to search on the internet and found a good thread on CG Society (http://forums NULL.cgsociety NULL.org/showthread NULL.php?t=1040698) where an artist responsible for clouds and tornadoes in Resistance 3 had made a few posts. I was pointed towards using a regular particle setup to nail the look and then control the fluid container with those particles. Brilliant!

In the afternoon I created my particle tornado. It consists of 5 emitters. One large torus emitter to create the center of the tornado and 4 smaller cylindrical volume emitters placed around the base to simulate the upward streams of air you get that contribute to the storm. Beyond the 5 emitters there are a total of 4 force fields that create the motion. The first force field is a uniform field that pushes the particles straight up. This is similar if not the same as a gravity field with a +Y force. The second field is a cylindrical vortex volume. This volume spins the particles while keeping them in a cohesive shaft. The third field is a cylindrical axis volume field. This is what makes the tornado spread outward from top to bottom. I’ve set it’s “around axis” attribute to X0 Y1 Z0. This tells the particles to spin around the Y axis. The attenuation value on this field is set higher so that the particles don’t instantly push out to the edge of the volume.

Attenuation acts like an ease in and out of the volume. If you set the attenuation value to zero on any field the particles will take on the motion of the volume as soon as they enter it’s space and this can create abrupt changes in direction. The final volume is a spherical volume axis field that has been squashed and placed atop the cone to push the particles outward. I’m using the “away from axis” set to X0 Y1 Z0 to achieve this.

For the first hour or so I really struggled to get the particles to follow a nice swirling motion and then I discovered my mistake. I have to set the particle’s (not the emitter’s) “conserve” value to 0. This stopped the particles from inheriting any initial motion and gave the force fields full control. If you don’t do this it’s an uphill battle to control their initial momentum. Now that I have my particle system down the next step is to create a fluid container that these emitters will be parented to. I’ve been told that since Maya 2011 particles and nParticles have been able to emit voxel data into a fluid container. Well see how well that goes…

terryTornado (http://www NULL.terrymatthes NULL.com/wp-content/uploads/2013/12/terryTornado NULL.jpg)

UPDATE

I got my particles emitting voxel data to the fluid container in Maya. I forgot to turn buoyancy off of the fluid container so the particles keep going up past the top of the funnel, but I’ll fix that on my next go. The fluid container is using the density information to shade the particles.

[R&D] Fire Starter

Maya Liquid Fire

I’ve started a new project involving Maya and Zbrush and a big part of it is going to use simulation data from Maya. There are three parts, smoke, water, and fire. I haven’t created a fluid effects fire in a while so I thought I would spend the morning working out some flames to get back into the swing of things. This fire was made from a 3D fluid container using a volume based emitter in Maya 2013. After I had parameters I was happy with I baked out the simulation into a cache file. This makes the rendering way faster as you’re not trying to simulate and render each frame at the same time. It also lets you store that data and scrub through your simulation.

I’m working of a Mac Mini right now which is a little weak in the processing department, but hey at least I have something to work with. Come Christmas I will be visiting Winnipeg so that I can get my computer along with the rest of my apartment and move it here to Montreal.

The end result for the project will be a lot more stylized, especially when it comes to colour. I find its always best to match the physical phenomenon as best you can before you start to push the style. The YouTube compression beats up the softness and sharp contrast of the flames, but it’s just a test so I didn’t want to have to sit and wait for a 180 frames and 1080p. This will do as a start for the next step of the project which will be shaping and re shading the fire. As always if you have any questions don’t be afraid to ask. I don’t bite, I promise :)


UPDATE

I squeezed in some more time this evening to iterate further on the flames, playing with the colour settings and getting them to spin the way I wanted using Maya’s force fields in the fluid container. This particular test makes the flames too skinny and high, but I feel I’ve nailed the mechanic down to make them spin.

[R&D] CGFX Shaders: Cubemaps

CGSL CubeMap Shader

After my work establishing a Phong model shader I wanted to incorporate cubemaps. Everything went fairly well. The next step is to combine this shader with my normal map shader.

If all goes well I can get that done tonight. I’m having a lot of fun with shader authoring. It’s a nice blend of computer science and art that I’m really enjoying. My end goal for learning CGFX is to be able to produce a small scene in the Unreal Engine where I’ve written all the shaders. Wish me Luck!


My First CGFX Shader

My First cgfx Shader

I’ve put if off for a while, but today I decided to jump into writing shaders. It took a while and a lot of wikipedia searches, but I finished tonight after having started this morning.

It’s a Phong shader based on a Lambert model. It has an added Fresnel highlight as well as controls for the glossiness strength and size. For textures it accepts Diffuse, Normal and Specular.

The next part I’d like to add is reflections and more specifically; cubemap reflections. I’m moving to Montreal soon and I think my best chance for work is to apply as a material artist.

I’m hoping my film work combined with my portfolio website and a new library of free to download materials will help me land a job. The maps it’s using right now are from an old ZBrush project, but they are good enough for proof of concept. More to come soon :)

My First cgfx Shader (http://www NULL.terrymatthes NULL.com/wp-content/uploads/2013/09/test_shader2 NULL.jpg)


Graveyard Shot Final

Windy Graves UDK

I’ve finished the UDK graveyard scene I was working on and started another :) This scene was fun to work on and it gave me a better understanding of the Unreal Engine as a whole. The most interesting part of the entire process was learning the UDK lighting system and how it handles (or doesn’t) BDRF in materials. For my next project I’m starting with a physically based shader that should make more sense coming from Maya. Putting together all the wind related meshes also taught me how far you can push cloth objects with simple skeletons and there will be more of that in my next piece.