« Posts tagged cheat

Maya Fur Tips

Fur as grass

Fur as grass 
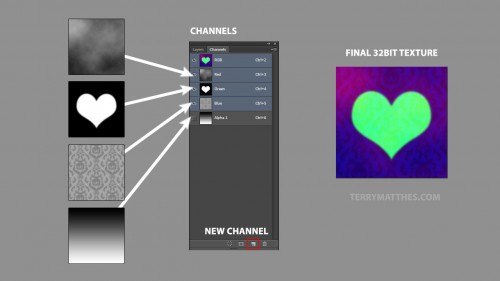
(http://www NULL.terrymatthes NULL.com/wp-content/uploads/2013/04/furpic NULL.jpg)
Hey dudes, and dudettes. Here’s a few tips on dealing with Maya fur as it can be a little hairy… get it?! Seriously though, Maya fur can be confusing and a little tricky to work with, so if you don’t have cash to blow on some fancy plugin here are a few tips to help you guys out.

A) Triangulate your fur surface! Fur seems to like triangles. If you notice you’re getting odd bald spots this can be the reason.

B) UVs are KING. Maya fur is heavily dependent on the face distribution of your model’s UVs. Tiny faces on your UV sheet are going to have really really low fur density. More often than not you have to create a second set of UVs for fur to operate on. This is OK though as the fur menu lets you choose which UV set to base your fur on. To access this menu go to Windows > Relationship Editors > UV Linking > Fur/UV. Make sure you are giving an even face distribution on your new UV set.

C) You will NOT see textured colour in your fur even after hooking up the proper tip and base colour maps until you hit the “Bake” button at the top of the fur description. Anytime you add a new maps in you’re going to want to bake as well.

D) Fur colour is very sensitive. The maps plugged into your fur descriptions colour slots should be crushed down quite low. For the fur above my “Color Gain” values in the file node’s “Color Balance” roll out were set as follows: Base Color=0.130 Tip Color=0.310 Base Ambient Color and Tip Ambient Color =0.230

E) If you fur shadows aren’t showing up you will have to increase you “shadow density” in the fur description under the Mental Ray roll out.

F) Work in a linear fashion aka Linear Workflow (http://vimeo NULL.com/8119194).

That’s all for now. May the fur be with you!

[R&D] Grey Packing

Grey Packing Method

Whaa, hugh? What the heck is it? Well grey packing refers to creating textures in photoshop that in and of themselves are not particularly useful, but each channel of colour, and possibly even an extra alpha channel contain useful grey-scale textures.

Think of the complete texture as a container or vehicle for getting as many materials as you can into your game or application as efficiently as possible.

A lot of materials use grey-scale textures for values. If you create a 32 bit image (targa for UDK) you can stack 4 grey-scale images into your file and that’s decreasing your memory usage by 300%! and using one quarter of the draw calls for those materials.

Grey Packing Method (http://www NULL.terrymatthes NULL.com/wp-content/uploads/2013/04/graypacking2 NULL.jpg)

To do this just go into your channel tab (next to layer) in Photoshop and you’ll see your four channels and their composite channel at the top. This is where you are going to copy and paste your grey images into. If you want another channel just create one with the new layer button. By default this channel is called “Alpha”.

Don’t forget to export as 32bit otherwise you’ll lose that extra alpha channel.

Cheers

Material Editor Keyboard Shortcuts

Unreal Development Kit User Interface Diagram

Posted these shortcuts a while ago at Eat3D (http://www NULL.eat3d NULL.com). I though I would repost them here to share with anyone who doesn’t frequent that site. If you aren’t though you should. They have amazing video tutorials.

Material Editor Shortcut Keys

Num Key 1 1 variable constant

Num Key 2 2 variable constant

Num Key 3 3 variable constant

Num Key 4 4 variable constant

E key Power node

R key Reflection Vector

T key Texture Sample

U key TexCoord

I key If node

O key 1-x node

P key Panner node

A key Add node

S key Param ‘None’ (0) node

D key Divide node

L key Lerp node

C key Mask (R G) node

V key Param ‘None” (0,1,2,3)

B key BumpOffset node

N key Normalize node

M key Multiply node

Unreal Unit Meshes – “UBlocks”

Unreal Block Meshes

After digging into the 2DPlatformerStarterKit (http://udn NULL.epicgames NULL.com/Three/DevelopmentKitGemsPlatformerStarterKit NULL.html) I began thinking about how I should go about creating my 2D test level. This level would be a staging ground for all sorts of pre-production tests. Things like lightning, particle systems, and mesh design would all be roughed out here. I always find if hard to visualize what sizes my meshes should be while working in Maya.  I was thinking that a quick way to rough out the size of a level and it’s meshes would be to use pre sized blocks like LEGO (http://www NULL.terrymatthes NULL.com/wp-content/uploads/2011/08/legos NULL.jpg).

I’ve made several different sizes of cube type meshes that area all using the same parent material. Each square on the grid texture represents 64 units in the Unreal engine. If your Maya grid isn’t setup  to work with the UDK change your grid settings to match these values…

Maya to UDK Grid Settings – Length and Width:2000 Grid Lines Every:64 Subdivisions:8

(http://www NULL.terrymatthes NULL.com/wp-content/uploads/2011/08/ublocksweb NULL.jpg)

UBlocks in default UDK Scene

The material network is pretty self explanatory, but I’ll go over it quick. There is a texture coordinate node that is being multiplied my a custom parameter node. This lets you control the parameter node’s value separately in all instances of this material. The “U” and “V” coordinates in the “Texture Coordinate” node are represented in the texture by red and green. Multiplying this node’s output will multiply each color channel in the texture. Increasing the value of red and green will tile the material. The new multiplied red and green values are then plugged into the grid texture’s UV input.

Shader network for UBlock parent material (http://www NULL.terrymatthes NULL.com/wp-content/uploads/2011/08/ublocks_mat NULL.jpg)

Shader network for UBlock parent material

Download UBlocks (http://www NULL.terrymatthes NULL.com/public/UBlocks NULL.zip) – I don’t mind if you redistribute the meshes with your projects, but please link this post or include the original ZIP file in your download.

UDK Platform Starter Kit Scene Scale

Unreal Development Kit Scale Chart

I was checking out the Unreal Developer Network (http://udn NULL.epicgames NULL.com) last night and found out they’ve released what is essentially a template for a 2D platformer (http://udn NULL.epicgames NULL.com/Three/DevelopmentKitGemsPlatformerStarterKit NULL.html). My brain just about exploded when I saw this. I’ve been trying to code my own bare bones 2D platform game class for quite some time, but most of my skills are geared towards art. I did however purchase the Introduction to Unreal Script (http://www NULL.eat3d NULL.com/unrealscript) from Eat3D.com (http://www NULL.eat3d NULL.com/). It helped me setup a proper development environment for the UDK, but I found the technical depth quite shallow. I guess that shouldn’t surprise me given that it’s an introduction :\

At any rate the documentation for the kit is pretty decent and if you have a basic understanding of level design you should be able to jump right in and start building your own levels and swapping characters. Before I went to work today I took some measurements of an in game shot to get an idea of the mesh sizes I’ll need to create in Maya. If you’ve never created anything for the Unreal Development Kit in Autodesk Maya then the first thing you will want to do is adjust your scene scale. Here is a YouTube video (http://www NULL.youtube NULL.com/user/jonathanvillaverde#p/u/18/v62ZJhryFP4) from Jonathan Villaverde’s channel (http://www NULL.youtube NULL.com/user/jonathanvillaverde) to help you get that done.

Default 2D Scale Measurements for UDK 2D Platformer Kit (http://www NULL.terrymatthes NULL.com/wp-content/uploads/2011/08/ScalePlatform2D NULL.jpg)

Default 2D Scale Measurements for UDK 2D Platformer Kit

UDK Interface Diagram

Unreal Development Kit User Interface Diagram

Pretty self explanitory. This diagram labels all the components in the Unreal Development Kit user interface. This version isn’t taken from the newest release of the UDK, but I will be updating this to the June beta release soon.

Unreal Development Kit User Interface  Diagram (http://www NULL.terrymatthes NULL.com/wp-content/uploads/2011/07/udk_interface NULL.jpg)

Unreal Development Kit User Interface Diagram

UDK Scale Chart

Unreal Development Kit Scale Chart

Here’s a scale chart to help you visualize things when you’re moving around in the Unreal Development Kit. Its set against assets from the Unreal Tournament III Game. The white numbers are Unreal grid dimensions. An average character is ~96 units high. To learn how to setup your Maya grid for proper scale see this this succinct  Youtube Video (http://www NULL.youtube NULL.com/watch?v=Xl5kJP02K0g). Peace.

Unreal Development Kit Scale Chart (http://www NULL.terrymatthes NULL.com/wp-content/uploads/2011/07/udk-scale NULL.jpg)

Unreal Development Kit Engine Scale Guide