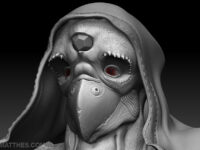
Hey everyone, just posting some final shots of my crow sculpt after several long evenings. The major change you’ll notice from the previous update is the feather treatment. On the old sculpt I used the snake hook tool to pull geometry out for the feathers. In the end I wasn’t happy with how this technique looked. For the final I created a few custom feather alphas. I would stamp a row of the feathers and then mask them off and pull out the next row, continuing this process until the entire chest was covered. For an initial foray into Zbrush I am happy with the results here, but I think that I need to learn more about the layers options and morph targets. The undo system seems somewhat tricky to work with and there were several occasions when it didn’t work at all. I also learned that my system can’t handle merging 3 different 13 million poly meshes. I’d chuck more RAM in, but I’m already at my boards 8GB max. I hope you all have a nice remembrance day.
 (http://www NULL.terrymatthes NULL.com/wp-content/uploads/2011/11/CrowFinal_persp2 NULL.jpg)
 (http://www NULL.terrymatthes NULL.com/wp-content/uploads/2011/11/CrowFinal_close NULL.jpg)
 (http://www NULL.terrymatthes NULL.com/wp-content/uploads/2011/11/CrowFinal_center NULL.jpg)
 (http://www NULL.terrymatthes NULL.com/wp-content/uploads/2011/11/CrowFinal_persp NULL.jpg)

 (http://www