 (http://www NULL.terrymatthes NULL.com/wp-content/uploads/2018/08/CGChallengeOne NULL.jpg)
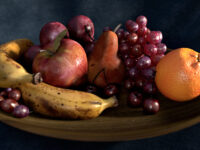
The models for everything in the scene were taken from 3DRender.com as part of their Lighting Challenge #1. I wanted to visit this challenge once more as a test of the free Renderman render plugin for Maya. The challenge is that you are given the 3D models to work with and your job is to texture, light and render the scene. Choice of lens and camera position are left up to the individual. I thought the plugin was fairly easy to work with and had a decent realtime render mode via CPU.
Workflow
- Clean the geometry
- Layout the UVs in Maya
- Import UV’ed objects into Zbrush
- ZBrush/Spotlight and photo references to paint fruit
- Stage in Maya
- Surface and light with Renderman
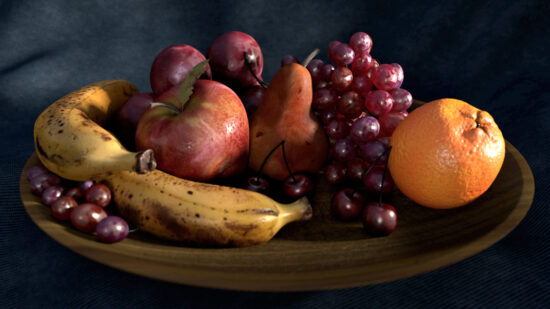
Photography
The photographs were taken in a lightbox using a camera mounted above it facing downwards.
I constructed the light box from white posterboard. The box itself was facing with the open side upwards. Then the camera straddled the box and the camera was underneath the tripod to shoot straight down. These are some samples of the raw shots
I later brought shots like these into Photoshop to remove an strong lighting info. I had one small setback when I was editing the photos. They had more grain than I anticipated, and it made it a little more difficult to fix some of the lighting info. Overall I was really happy with the results.
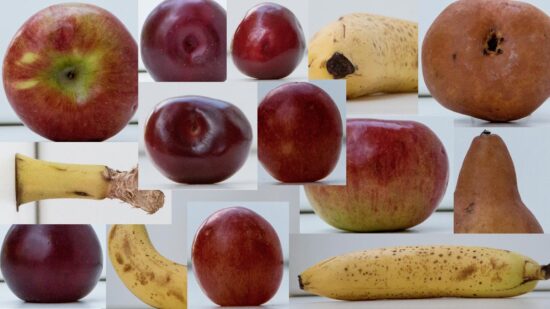 (http://www NULL.terrymatthes NULL.com/wp-content/uploads/2018/09/fruitcollage NULL.jpg)
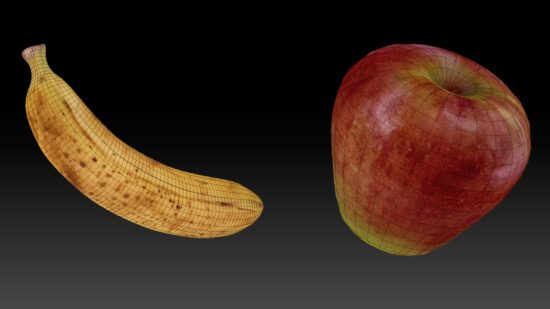
UV Work
The majority of the shapes are spherical in nature, so the UVs followed and were produced with spherical projections. I did want to try something different on the banana though. I cut the bananas along their natural edges and then squished them out of the peel. After the peel was flattened I snapped a shot. Later on in Maya I formed the UVs around the image. The bananas turned out great and I feel this was a big part of why.
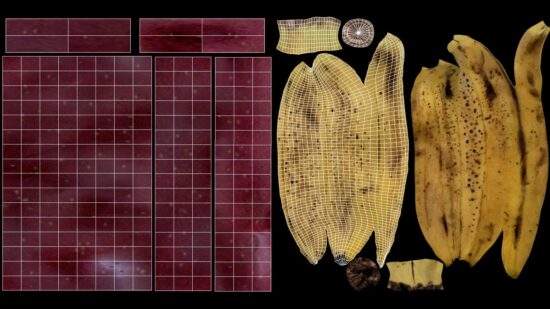 (http://www NULL.terrymatthes NULL.com/wp-content/uploads/2018/09/fruituvs NULL.jpg)
ZBrush / Spotlight
ZBrush is always fun to work in. I think that’s one of the programs big wins. Before Substance Painter came along it was a great way (and still is) to get your assets textured. Being able to resample areas of textures to stamp using Spotlight feels awesome. It lets you mix and match details from several different photos with ease. Painting your objects in 3D is such a liberating feeling when compared to painting in 2D.
 (http://www NULL.terrymatthes NULL.com/wp-content/uploads/2018/09/fruitZbrush NULL.jpg)
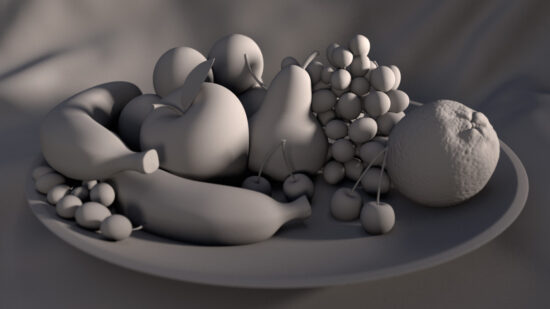
Lighting / Surfacing
There are two spotlights in the scene the key light is on the far right. It’s pushing through a large light blocker with a windows shape punched out. The fill light coming from the left of the photos is doing it’s job of pulling the shadows up so they appear softer. The surfacing of the fruit was easier to do in Renderman than previous render plugins. I found that the ability to control the second specular lobe made a huge difference. Although it isn’t necessarily physically correct that doesn’t matter in this instance. The interactive rendering you can do with even just your CPU for Renderman is pretty good. The one thing that really superised me with Renderman was the render settings you have to play with. Compared to Vray, or really any other render plugin out there it’s fantastic. There are a few confusing things like the colour you get when using Sub Surface Shading, but it is explained in the online documentation.
 (http://www NULL.terrymatthes NULL.com/wp-content/uploads/2018/09/lightingFruit NULL.jpg)
Conclusion
Overall I would recommend RenderMan to anyone who wants to free their artistic mind and get away from being bogged down with technical details.
 (http://www