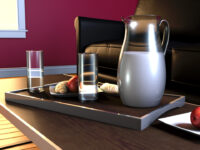
This image was created for my rendering class in college. We were given the objects and asked to properly light and render them. The style of render was left up to us. The challenge with this assignment is to get the glass looking right. Most of the objects needed to be unwrapped so that’s the first thing I did. Unlike my last apartment render (http://www NULL.terrymatthes NULL.com/general/news/apartment-final-render-thoughts/) this piece can contain no global illumination or final gather. Any bounced light is simulated with secondary light sources. I had to remodel the glasses as their were lots of strange triangles buggering up the reflections. The pitcher and the glasses have separate faces for the inside and outside of the object. Under the glass mesh render properties the objects are set to one sided.
One thing to keep in mind while rendering glass in Maya and Mental Ray is black surfaces. If you are rendering a translucent or semi translucent object and you are getting black artifacts or faces on your render then you need to increase your reflection rays in the object’s material properties. Reflections and refractions take a long time to render due to the amount of ray casting going on. Too many rays and you can drastically increase your render time. Too few and you’ll get black faces where the rays didn’t penetrate the objec. Reflections are a little tougher as you actually have to know what should be reflected. If you can’t see them at all it’s a littler tougher to guess which ones are missing. If you’re casting enough rays within each material and you’re still getting black faces then chances are you have not set your ray tracing limits high enough in the scene’s render settings. In case you didn’t know there is a master ray trace control found under the “Quality” tab in the render settings window.
The colours of the piece are still pretty loose. I was playing around with Adobe Kuler (http://kuler NULL.adobe NULL.com/) and though it was a pretty fun tool to choose a colour pallet. My biggest problem at this point is the strength of the lighting in relation to the floor reflections. I’d like to keep the light warmer (3500k), but I’d also like to get some less harsh reflections in the floor. Most of what’s left to do involved tweaking materials and finalizing a colour pallet. I might take a swing at Maya fur again, but we’ll see if time allows it. I’ve been working part time in while going to school and it’s really been cutting into the amount of time I have to get homework (let alone personal projects) done. I would cut my hours down, but at my work the minimum for part time is 20. I did find a wonderful way to save time though… I set my computer up so I can login remotely. This makes it a lot easier to setup and look at renders. I suppose I could just batch render multiple files with a script, but I wouldn’t be able to change anything after I leave home. I don’t know about you guys, but I frequently get hit by ideas while out and about and this lets me incorporate those changes into the renders.
 (http://www NULL.terrymatthes NULL.com/wp-content/uploads/2011/10/glassesRough NULL.jpg)

 (http://www
 (http://www