« Posts tagged global illumination

Apartment Final Render Thoughts

For now I’m finished with this apartment render. I’ve learned a lot, but it’s time to move on to another project. I will definitely revisit this in the future as I learn more about Mental Ray. I think the most challenging part for this project was fine tuning the global illumination and final gather settings. This is the first time I have worked with either. The fur system was really easy to use and while there are a lot of settings most of them just let you add randomization to the basic properties. The fur and fabric shader on the ottoman required a lot of anti aliasing to catch-all the crisp detail.

The final settings for anti aliasing in the “quality” tab were set to “adaptive” and 4. If I did it again I would have set the final quality control to 3 as I found 256 samples is a little over kill and takes almost twice as long as when set to 3. Keep in mind though that the setting is not “mandatory”. That means that not every pixel is getting 256 samples, just the ones that Maya determines need it. I’m not quite sure how the algorithm works that controls this, but it is something I plan to look into. In retrospect I don’t think I would ever paint a room that bright of a green, but you must have fun with these kinds of projects; right? :D

On a side note, I was at the gas station the other day and while I was waiting in line I found a great magazine called “Elle Decor” (http://www NULL.elledecor NULL.com/). I’m pretty sure it’s aimed at women, but it’s got a ton of really sweet interior designs inside that are giving me lots of inspiration. More posts soon. If you have questions ask away.
(http://www NULL.terrymatthes NULL.com/wp-content/uploads/2011/06/apt1 NULL.jpg)

Apartment Render Update + Maya Fur

Detailed Portion of the Full Resolution Render

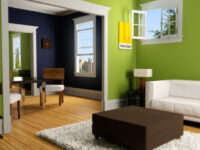
I’m just about 70% done my apartment render so I thought I would post an update. This is a to scale model of my old apartment. I had some previous renders, but the scale was off (really off) and it was causing all my lightning to be blown out. After Fixing the scale I noticed I was getting black renders even though Global Illumination and Final Gather were working properly. The issue was that my portal light’s intensity wasn’t near strong enough. I had to jack it up to about 2 billion! Crazy. I eventually toned it down to 1 billion, but anything under that and the light really dies off quickly.

As far as assets go I have modeled a sofa table and television which don’t appear in this render, but they will be in the next one. I think I’m also going to take out the couch for now because I just ordered one of the best leather sofas (http://fineleatherfurniture NULL.com/leather-furniture-blog/blog-list/513-the-best-leather-furniture-manufacturers-quality-not-quantity) to replace it, and I don’t have the space needed or time to give the old couch model the love it needs.
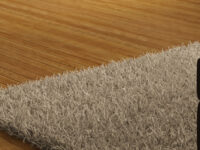
The shag carpet was really fun to work on. I’ve never used the Fur System in Maya before, but after the Introduction To Maya Fur (http://www NULL.digitaltutors NULL.com/11/training NULL.php?cid=42&pid=264) on Digital Tutors (http://www NULL.digitaltutors NULL.com) I really was excited to give it a try. I used carpet texture on a plane and told the fur system to grab its base and tip colours from that. going forward I think I might make the base and tip of the fur a little thicker. Other options were played with such as “scraggle”, “poll”, and “inclination”. It’s worth noting that under the Fur Feedback Description node there is a section called “Details”. Under this section you can add randomness to all the attributes. If you’re interested in all of the different fur properties there is a good textual resource over at http://caad.arch.ethz.ch/info/maya/manual/MayaFur/UserGuide/2CreatingFur.fm.html#176880 (http://caad NULL.arch NULL.ethz NULL.ch/info/maya/manual/MayaFur/UserGuide/2CreatingFur NULL.fm NULL.html#176880)

When it came to picking a backdrop I just grabbed something off of Google image search for the time being. I quickly used the layer properties of the render in Photoshop to drop out the windows as they were solid white. For the final shot I think I’ll climb my old fire escaped and snap a shot with my Wife’s camera. She has a nice Cannon 40D. I don’t plan on using HDRI for image based lightning just yet, but maybe I will set myself up so I can experiment with that another time :)

One thing I did notice in the render was the aliasing lines in the ottoman’s fabric. The lines stayed there when I raised the anti-aliasing to adaptive sampling set @ 64 samples. They went away when I tested that area with 256 adaptive samples.

At any rate here is the shot and if you have any question just ask in the comments or fire me an email. I’m around computers all the time so I respond fairly quickly to questions. I’m going to have this done in the next couple days so expect a finished post soon. I will also include depth of field in the final render. Above the full scene render is a detail render of the scene at full scale.
Detailed Portion of the Full Resolution Render (http://www NULL.terrymatthes NULL.com/wp-content/uploads/2011/05/detail NULL.jpg)

.

Apartment Render Test 02 (http://www NULL.terrymatthes NULL.com/wp-content/uploads/2011/05/apartmenttest2 NULL.jpg)

Mental Ray Linear Workflow Tests

So, I’ve decided to take a better look at using a proper linear workflow within Mental Ray and part of that seems to be learning Global Illumination and Final Gather. These lightning systems have always seemed scary and complicated to me, but after some great tutorials at Lester Banks.com (http://www NULL.lesterbanks NULL.com)and Stuart Christensen (http://www NULL.youtube NULL.com/user/deepfriedectoplasm)‘s YouTube channel I am starting to see the light :) I would also like to thank Brandon from Backwards8.com (http://www NULL.backwards8 NULL.com)for sitting down with me the other day to explain some of the different GI and FG settings.

Labatt Beer with ice (http://www NULL.terrymatthes NULL.com/wp-content/uploads/2011/04/beer_ice NULL.jpg)I dug up a scene I had modeled a few months back of my old apartment. This is lighting s a test to see how I would like to take the render further. The render itself is black and white and the few textures and colours in it were added in Photoshop. I should mention that I’m not using the mia_roundCorner node. There are 5 area lights in the scene being controled by a mia_portal_light. Right now the large windows are emitting 1,000,000 photons per light and the smaller windows are emitting 500,000. The portal lights are all connected to the same mib_blackbody node which is outputting a colour temperature of 5500K. This is in an effort to simulate mid-day sun. The render camera is set up so that the film back is the same ratio as the resolution gate (960×540 px) and I added the lens shader mia_exposure_photographic to even out the gamma. I am still getting a bit of blotchyness around the corners, but part of that is due to the area light samples being set at 16. Overall I am really happy with this as a test and I will keep posting updates as my work progresses. I’ve also done a small linear light test with a beer can model and I will post that shot when I get off of work. If you have any questions about settings or the process as a whole post a comment below or shoot me an email (terry null@null terrymatthes NULL.com).
.
Global illumination and final gather rough render. (http://www NULL.terrymatthes NULL.com/wp-content/uploads/2011/04/apt_test NULL.jpg)
.