I’ve wanted to try this tutorial for a while and now that I have I thought I would share it with you guys. Creating seamless textures (http://www NULL.terrymatthes NULL.com/unreal-2/materials/seamless-textures-in-photoshop/http://) is one thing, but tiling mesh surfaces isn’t always as easy as it may seem. Osart has posted a tutorial (http://osart3d NULL.wordpress NULL.com/home-page/tutorial-creating-perfectly-tiling-meshes-in-zbrush-for-use-in-videogame-environments/) on his blog (http://osart3d NULL.wordpress NULL.com/) that walks you through the process with a couple of different paths you can take when it comes to developing your low poly version of the mesh. The process involves using Zbrush to create a tiling displacement map. The only part of the tutorial I got hung up on was the UV section. At one point he asks you to “normalize” a group of UVs. Normalizing the UVs is done by selecting the particular UV shell you want and then going to Edit UVs > Normalize under the Polygon menu tab. This scales the shell you have selected so that it takes up the entire 0-1 texture coordinate space.
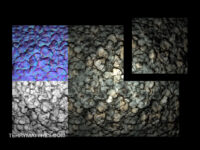
The tutorial is full of really really great stuff. You should go RIGHT NOW and check it out. Below is a tiling rock mesh I made using Osart’s Tutorial (http://osart3d NULL.wordpress NULL.com/home-page/tutorial-creating-perfectly-tiling-meshes-in-zbrush-for-use-in-videogame-environments/). To make the normal and ambient occlusion maps I used xNormal. The diffuse map was painted in Photoshop. If you have any questions I would try and get a hold of Osart, or I could help you as well.
The next step I’m going to take is to bring this mesh into the UDK and create a material for it. I’ll append this post with those results over the next few days.
 (http://www NULL.terrymatthes NULL.com/wp-content/uploads/2012/04/Rocks_togeather2 NULL.jpg)Weekend Update!
I’ve imported the mesh as an FBX into UDK and softened all the verts. Rocks have a funny specular pattern and it wasn’t something I could create within the UDK so I created a separate specular map. The following material uses a normal, diffuse, and specular map. Instead of explaining the whole map I thought I would just post it along with a shot of the rock mesh titled several times in the UDK.
 (http://www NULL.terrymatthes NULL.com/wp-content/uploads/2012/04/rocks_material NULL.jpg)
 (http://www NULL.terrymatthes NULL.com/wp-content/uploads/2012/04/rocks_UDK NULL.jpg)
 (http://www
 (http://www